
Features
接上一篇,Apple Watch 使用的时候会有三种主要的场景,在开发的时候Watch App 这一项是必不可少的,Glances以及Notifications的创建是根据需求的。这篇主要是介绍另外的两个场景,分别是Glances以及Notifications。
一.Glances概述(Essentials)
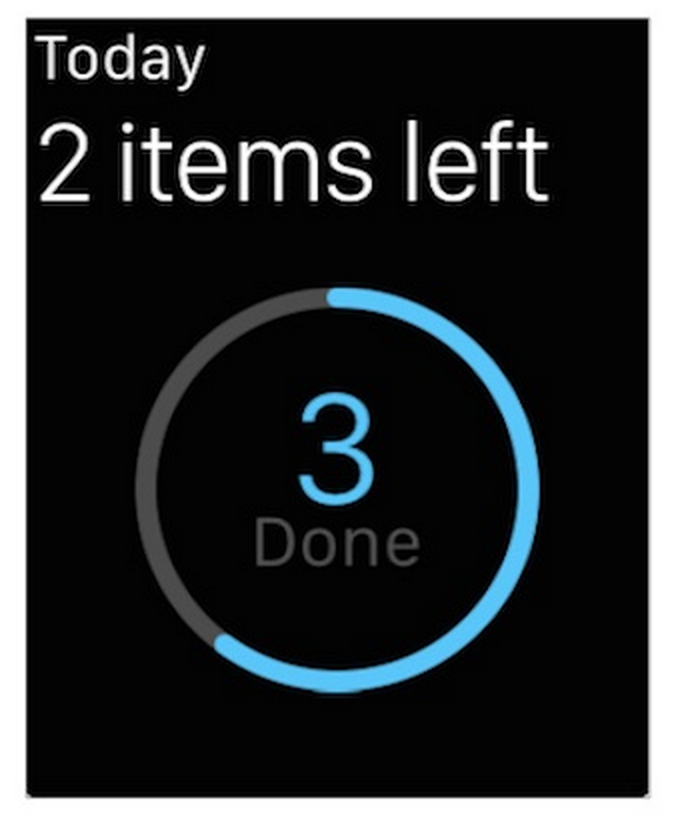
Glances 提供了应用程序呈现重要数据和信息给用户的一个非常好的方式,不是所有的App都需要这样一种方式,一个Glance应该要提供一个实时的信息,例如,一个日历App呈现一个Glance去告诉用户下一个会议的时间等等,一个航空软件可以呈现即将到来航班的候机地点等等,下图是官方DemoLister展示的Glance,它所要告诉用户的是用户今天还有几个计划没有做完。
Glance是WatchKit App以及WatchKit Extension的一部分,主要的界面在故事板中,通过一个控制器去管理,开发者的主要任务是去填充内容,Glance不支持交互,点击Glance就会进入到Watch App当中的相应的界面中。
1.Glances 的生命周期(LifeCycle)
Glances 的生命周期和其他的控制器几乎是一样的,除了一点,那就是这个控制器早早的被初始化了,所以呈现的速度非常的快。更多的信息可以参考WatchKit Extension Life Cycle。
2.Glance 界面指南
设计界面的时候尽量遵循以下的要点
1.不要显示夯长的信息流,简洁明快。适当的应用图形、图像、颜色、动画等等 2.专注于最重要的数据,Glance不是watch app的替代品,负责锦上添花就可以了。 3.设计界面的时候不要考虑交互,按钮啊、滑动条啊、开关按钮啊或者菜单。 4.避免使用表格和地图,虽然不是明令禁止,但是过小的空间使得表格和地图用处不大。 5.及时的显示信息,时刻记住要根据当前用户来更新Glance所显示的内容。
最后记住一点就是一个App只有一个Glance,所以创建了它就要好好利用它,让它呈现最有用的信息。
二.管理Glances的界面
创建Watch App 的时候可以直接勾选上Glance,也可以在之后的开发中创建一个Glance 界面,如下:
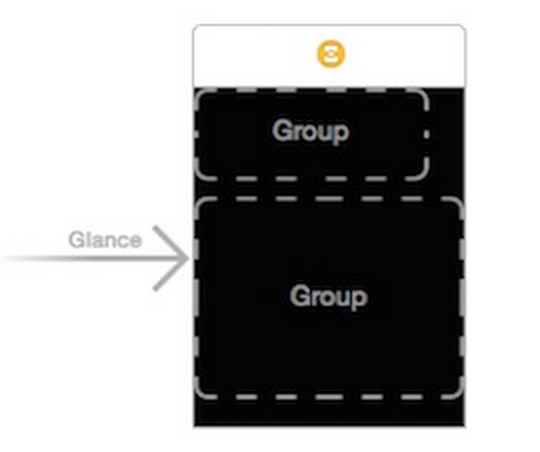
创建一个Glance,并且关联一个控制器即可。
具体的代码如下:
- (void)awakeWithContext:(id)context {
// Load image from WatchKit Extension.
NSData *imageData;
if ([[WKInterfaceDevice currentDevice] screenBounds].size.width > 136.0) {
imageData = UIImagePNGRepresentation([UIImage imageNamed:@"42mm-Walkway"]);
} else {
imageData = UIImagePNGRepresentation([UIImage imageNamed:@"38mm-Walkway"]);
}
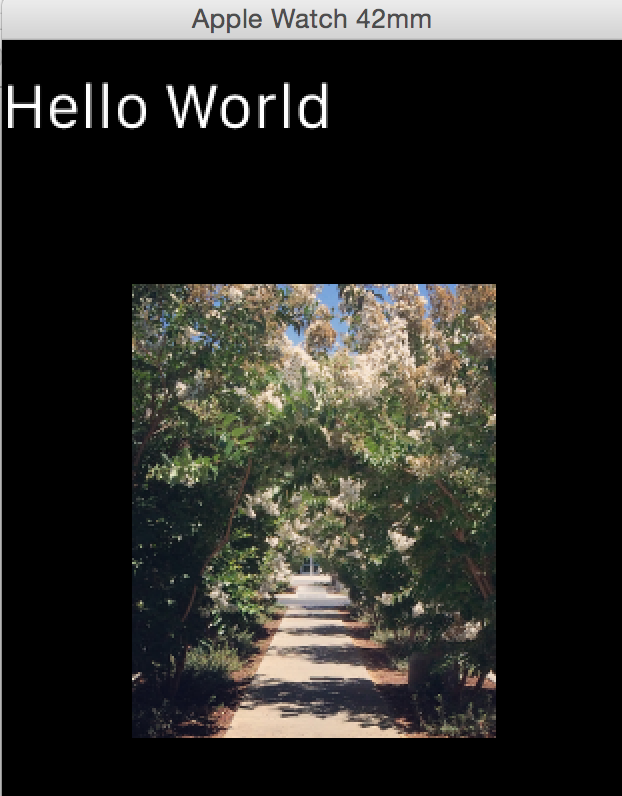
[self.glanceImage setImageData:imageData];
[self.glanceLabel setText:@"Hello World"];
}一般来说,点击Glance 会进入到Watch App 的主界面中,但是也可以自定义的, updateUserActivity:userInfo: 调用这个方法即可。调用这个方法之后,会在登陆watch app 的登陆序列中去寻找actionForUserActivity:context:这个方法去找到具体是哪一个controller去显示内容,会根据这个控制器唯一的名字去找,然后呈现。
主界面要实现的代码如下:
- (NSString *)actionForUserActivity:(NSDictionary *)userActivity context:(id *)context {
    // Set the context to meaningful data that may be in userActivity. You can also set it to data you derive from userActivity.
    *context = userActivity[@"detailInfo"];

    // The string returned should be the scene's Identifier, set in Interface Builder, for the controller you want to route the wearer to.
    return userActivity[@"controllerName"];
}
Glances 中要去做的代码如下:
    // Use Handoff to route the wearer to the image detail controller when the Glance is tapped.
    [self updateUserActivity:@"com.example.apple-samplecode.WatchKit-Catalog" userInfo:@{
        @"controllerName": @"imageDetailController",
        @"detailInfo": @"This is some more detailed information to pass."
    }];
这样就可以在用户点击Glance 的时候进入到相应的界面,上面的代码将会进入到imageDetailController这个控制器中显示详细的内容。
三.Notifications概述(Essentials)
如果我们的iOS App 支持本地或者远程的通知,那么Apple Watch 也可以,当一个通知到达了用户的iPhone的时候,iOS决定是否现在在iPhone上以及Apple Watch上,当通知到达watch之后,第一时间会有一个微小的变化通知用户,用户选择去查看的时候,再会显示一个短的版本,只有用户继续查看的时候才会显示通知的长版本,在长版本中进行交互,进入到App中或者按掉这个通知。
Apps 不需要特殊处理通知,系统会提供一个默认的版本,当然开发者也可以自定义一套来使用。
1.短版本 Short-Look Interface
用户第一次查看通知的时候会首先看到一个短的版本,一个简单的例子如下图:
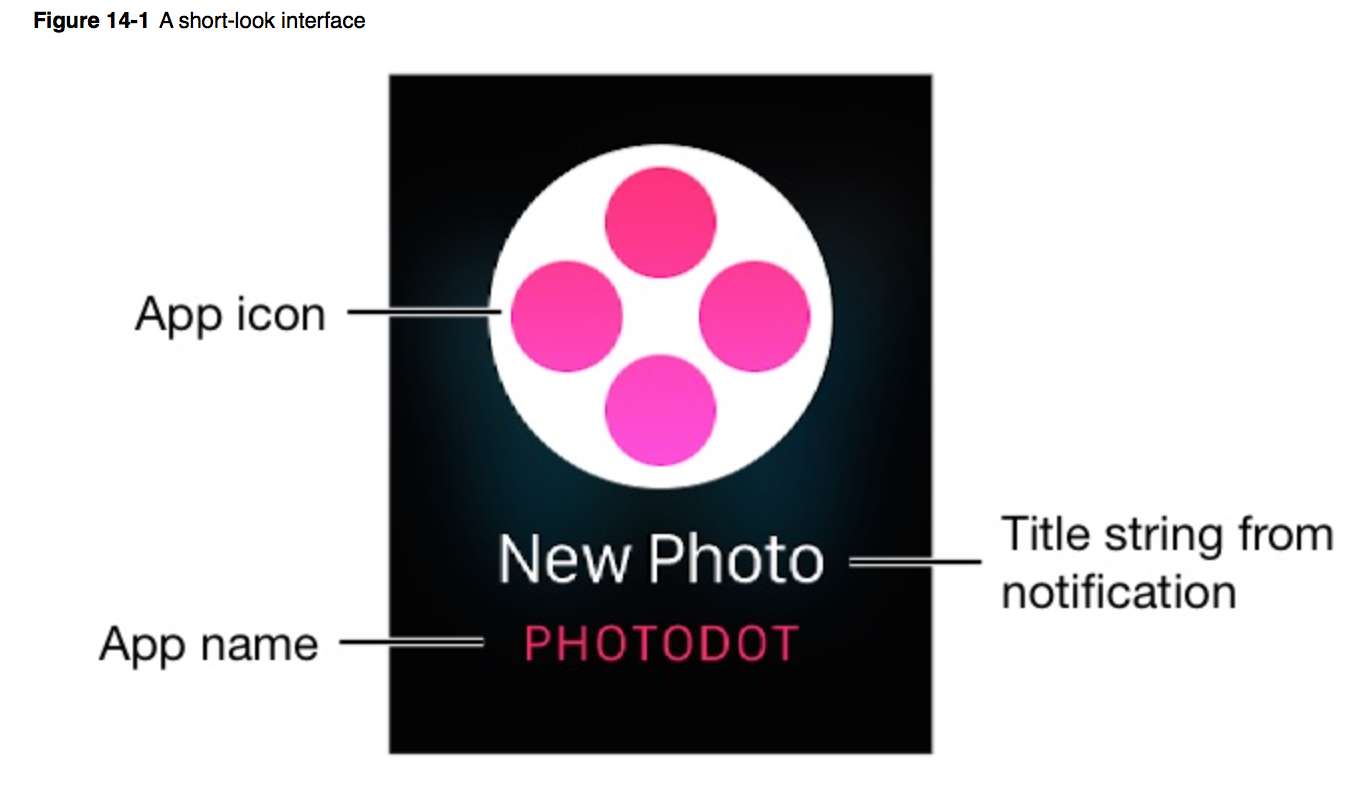
它是不能滚动的,也不能够被定制,系统会显示App 的名字以及App 的图标Icon,以及一条通知信息,如果用户继续阅读,系统会迅速的切换到Long-Look Interface中。
2.长版本 Long-Look Interface
长版本就可以滚动了,而且会显示通知的内容以及相关的按钮什么的,如果我们没有提供自定义的界面,系统就会显示一个默认的,默认的版本包括了软件名字、图标、通知信息,如果有自定义的就会呈现自定义的。
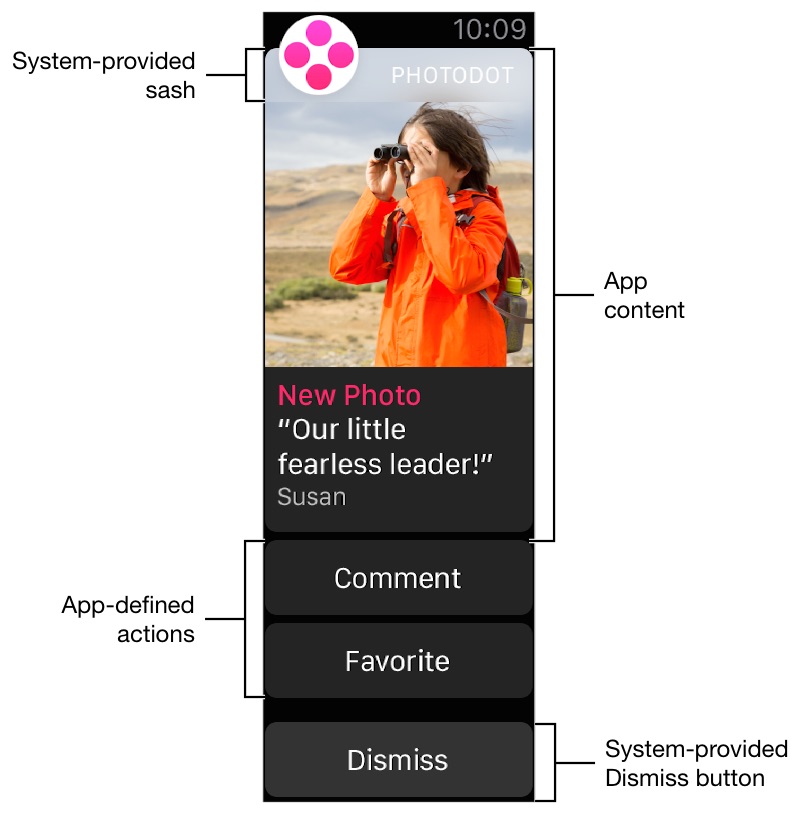
Long-Look 版本提供了三个区域:
1.
sash区域显示软件名字和软件的图标,默认是透明的,当然也可以自定义颜色。 2.Content area包括了通知的详细的内容,这片区域我们可以设置成在sash的下边也可以设置成从sash的底部开始内容 3.底部是按钮区域,包含了一个dismiss按钮,以及其他的自定义的按钮,Dismiss按钮由系统提供并且经常存在。。。
下边是一个简单的例子:
点击sash以及Content area都会直接登录到app中,点击自定义的按钮登录WatchKit extension或者iOS app,前台动作发送给WatchKit,后台的发送给iOS App,注意这里是后台的发送给iOS App,不能够将iOS App 也就是主程序打开。就这个问题我也是在开发者论坛里边咨询了一下,苹果的工程师的建议是采用HandOff去实现我的需求。我的需求是用户只在手表上阅读文章的摘要,然后去到iPhone上阅读相应的文章全文。HandOff还在调研,不过确实是一个可行的方法。

再就是Xcode 6.2 Beta2 当中WatchKit加入了一个新的方法,是直接和iOS App 通信的,但是那个也是后台的行为。 Host App 中调用这个方法:
- (void)application:(UIApplication *)application handleWatchKitExtensionRequest:(NSDictionary *)userInfo reply:(void(^)(NSDictionary *replyInfo))reply NS_AVAILABLE_IOS(8_2);WatchKit 中调用这个方法
+ (BOOL)openParentApplication:(NSDictionary *)userInfo reply:(void(^)(NSDictionary *replyInfo, NSError *error)) reply; // launches containing iOS application on the phone目前在模拟器中这么做会打开iPhone 的程序,这个在真机上是不会出现的,这个是不是一个BUG有待考证。

3.增加一个动作按钮在通知中
iOS8 之后我们可以在主程序中使用UIUserNotificationSetting这个类去生成通知,app就可以定制通知的种类和各个种类对应的操作了,Apple Watch 使用这个方式去创建在Long-Look通知中的按钮动作。
以下代码是在Host App中注册的实例代码:
func registerSettingsAndCategories() {
    var categories = NSMutableSet()

    var acceptAction = UIMutableUserNotificationAction()
    acceptAction.title = NSLocalizedString("Accept", comment: "Accept invitation")
    acceptAction.identifier = "accept"
    acceptAction.activationMode = UIUserNotificationActivationMode.Background
    acceptAction.authenticationRequired = false

    var declineAction = UIMutableUserNotificationAction()
    declineAction.title = NSLocalizedString("Decline", comment: "Decline invitation")
    declineAction.identifier = "decline"
    declineAction.activationMode = UIUserNotificationActivationMode.Background
    declineAction.authenticationRequired = false

    var inviteCategory = UIMutableUserNotificationCategory()
    inviteCategory.setActions([acceptAction, declineAction],
                  forContext: UIUserNotificationActionContext.Default)
    inviteCategory.identifier = "invitation"

    categories.addObject(inviteCategory)

    // Configure other actions and categories and add them to the set...
    var settings = UIUserNotificationSettings(forTypes: (.Alert | .Badge | .Sound),
                          categories: categories)

    UIApplication.sharedApplication().registerUserNotificationSettings(settings)
}
4.响应动作按钮的点击事件
当一个用户点击了通知上的按钮,系统就会去寻找之前注册的通知中的这个类型的动作的具体的实现动作,分前台和后台动作,之间的区别如下:
1.前台动作会发送给WatchKit App 并且交付button的ID给界面的控制器
2.后台动作会发送给主程序(Host App)的后台,动作会被交付给:
application:handleActionWithIdentifier:forRemoteNotification:completionHandler:或者
application:handleActionWithIdentifier:forLocalNotification:completionHandle:值得注意的一点是 WKUserNotificationInterfaceController子类是不会去处理动作的,选择前台动作会登陆watch app,然后装载主界面的控制器,所以主界面的控制器必须要实现
handleActionWithIdentifier:forRemoteNotification:
handleActionWithIdentifier:forLocalNotification:
这两个方法去处理本地通知和远程通知上的动作操作。
四.管理Notification的界面
一个自定义的通知界面包含两个部分,一个是静态的,一个是动态的,动态的界面显示完整的自定义的通知的内容,并且可以包含由Watchkit提供的自定义的图形和内容,而静态的界面只是一个简单的界面,仅仅用来包含通知的信息和静态的图片和文字,这些是在我们设计的时候就已经设计出来的。
当我们加入了一个新的通知界面之后,Xcode就会为我们生成这两个interface,如下图所示:
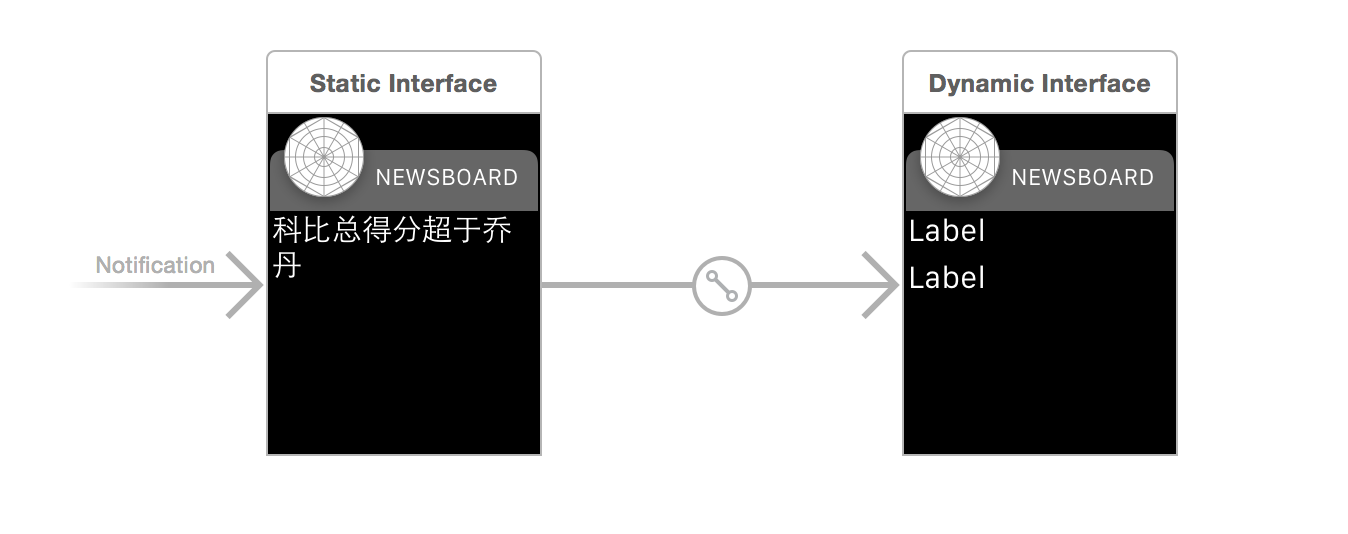
静态的那个是需要保留的,但是动态的那个倒是可以删除掉的,他俩使用的是一个通知类型。当一个满足这个种类的通知到来之后,系统会优先去呈现动态的通知界面,如果没有才会去呈现静态的。或者使我们指定了就显示静态的通知界面的时候,系统也会忽视掉动态的界面来显示静态的,在下面这两个方法中设置:(采用默认的 WKUserNotificationInterfaceTypeDefault)
- (void)didReceiveRemoteNotification:(NSDictionary *)remoteNotification withCompletion:(void (^)(WKUserNotificationInterfaceType interface))completionHandler- (void)didReceiveLocalNotification:(UILocalNotification *)localNotification withCompletion:(void (^)(WKUserNotificationInterfaceType interface))completionHandler程序可能会包含很多个通知的类型,需要通过通知类型这个对象去识别,WatchKit使用这个对象去决定在运行时具体去显示哪一个通知界面。如果进来的通知没有类别可以识别,那么系统就会调用默认的通知。
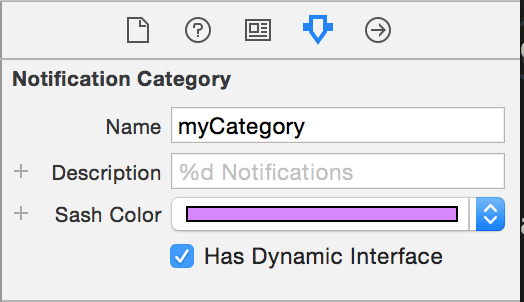
1.配置一个自定义的通知界面
每一个通知界面必须要指定一个通知的类型,如图指定,还可以设置sash 的颜色。
2.配置静态的通知界面
创建一个静态的通知界面的作用是为了无法显示动态的时候显示一下,有点像备胎的意思。。设计原则如下:
1.所有的图片资源必须放在WatchKit App bundle中 2.界面不要包含控制控件儿、表格、地图以及其他的可交互的元素 3.notificationAlertLabel这个label必须要关联一个标签,用来显示通知信息用的
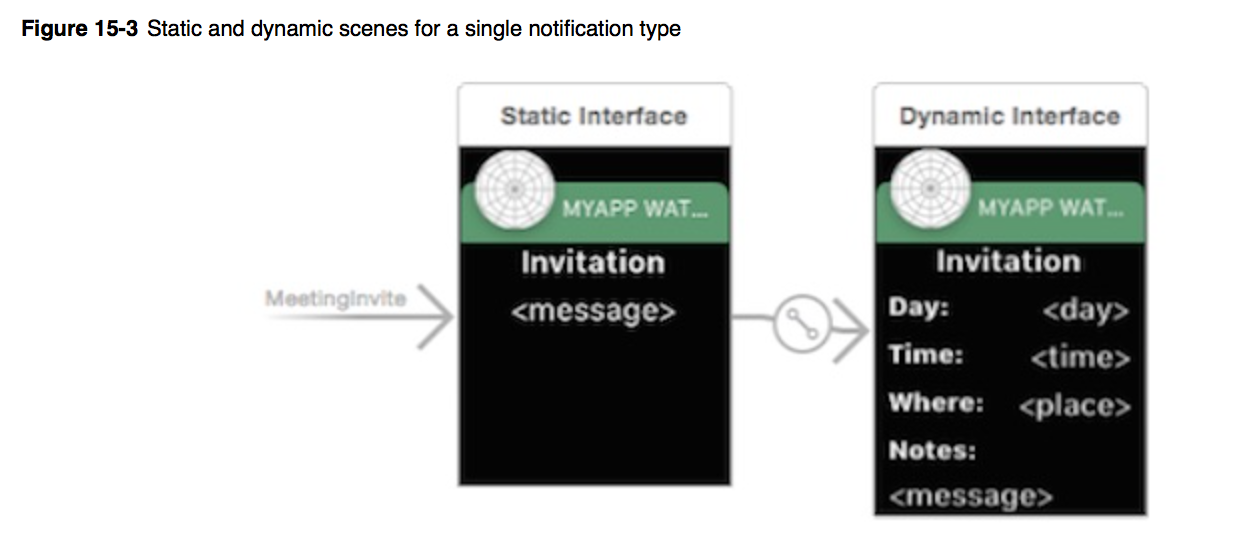
下图是一个日历软件配置静态通知页面的一个例子:
3.配置动态的通知界面
动态通知使得我们可以提供一个更加丰富的通知体验给用户,通过动态的通知,我们可以提供更多的信息。总之就是更加酸爽。为了实现动态的通知,我们要生成一个WKUserNotificationInterfaceController子类,这个类的实现主要负责配置动态通知出现时候的种种。
配置这个界面和配置其他的控制器所控制的界面是一样的,通过outlet关联界面中的元素,在运行时分配相应的操作动作,点击之后会进入到程序中,因此要避免使用交互,也就是说可以包含标签啊图像分割线什么的,甚至是必要的时候要加入表格和地图(因为地儿大了),但是不要加入按钮、转换按钮等交互元素。
初始化的时候Xcode会提供一个PayLoad数据,对于远程的通知,WatchKit调用 didReceiveRemoteNotification:withCompletion:而对于本地通知,调用方法: didReceiveLocalNotification:withCompletion:,通常情况之下,使用这个两个方法之后,要尽快的执行提供的完成block,不要等太久,要不然系统就回去呈现静态的通知界面了。。。
如下是 didReceiveRemoteNotification:withCompletion:一个简单的实现,它是在一个日历APP发送了一个远程的通知(新的会议邀请)。方法会提取远程通知中payload的数据,并且使用这些数据来填充界面上的元素,例子中没有容错,自己的代码中尽量加上容错,确保payload是合法可用的,配置好标签之后,调用完成的block,来告诉WatchKit,动态的通知界面已经准备就绪,可以呈现了。
// 两个远程通知的payload 中的key.
NSString* apsKeyString = @"aps";
NSString* titleKeyString = @"title";

// App中特殊的Key.
NSString* customDataKey = @"cal";
NSString* invitationDateKey = @"date";
NSString* invitationLocationKey = @"loc";
NSString* invitationNotesKey = @"note";

- (void)didReceiveRemoteNotification:(NSDictionary *)remoteNotification withCompletion:(void(^)(WKUserNotificationInterfaceType interface)) completionHandler {
    // Get the aps dictionary from the payload.
    NSDictionary* apsDict = [remoteNotification objectForKey:apsKeyString];

    // Retrieve the title of the invitation.
    NSString* titleString = [apsDict objectForKey:titleKeyString];
    [self.titleLabel setText:titleString];

    // Extract the date and time from the custom section of the payload.
    // The date/time information is stored as the number of seconds since 1970.
    NSDictionary* customDataDict = [remoteNotification objectForKey:customDataKey];
    NSNumber* dateValue = [customDataDict objectForKey:invitationDateKey];
    NSDate* inviteDate = [NSDate dateWithTimeIntervalSince1970:[dateValue doubleValue]];

    // Format the date and time strings.
    NSDateFormatter *dateFormatter = [[NSDateFormatter alloc] init];

    // Call a custom method to get the localized date format string for the user.
    // The default date format string is "EEE, MMM d".
    dateFormatter.dateFormat = [self dateFormatForCurrentUser];
    NSString *formattedDateString = [dateFormatter stringFromDate:inviteDate];

    // Call a custom method to get the localized time format string for the user.
    // The default time format string is "h:mm a".
    dateFormatter.dateFormat = [self timeFormatForCurrentUser];
    NSString *formattedTimeString = [dateFormatter stringFromDate:inviteDate];

    // Set the date and time in the corresponding labels.
    [self.dateLabel setText:formattedDateString];
    [self.timeLabel setText:formattedTimeString];

    // Set the location of the meeting.
    NSString* locationString = [customDataDict objectForKey:invitationLocationKey];
    [self.locationLabel setText:locationString];

    // Set the invitation's notes (if any).
    NSString* notesString = [customDataDict objectForKey:invitationNotesKey];
    [self.notesLabel setText:notesString];

    // Tell WatchKit to display the custom interface.
    completionHandler(WKUserNotificationInterfaceTypeCustom);
}可以看到最后调用的是WKUserNotificationInterfaceTypeCustom这个实例,如果采用 WKUserNotificationInterfaceTypeDefault则会呈现静态的通知界面。
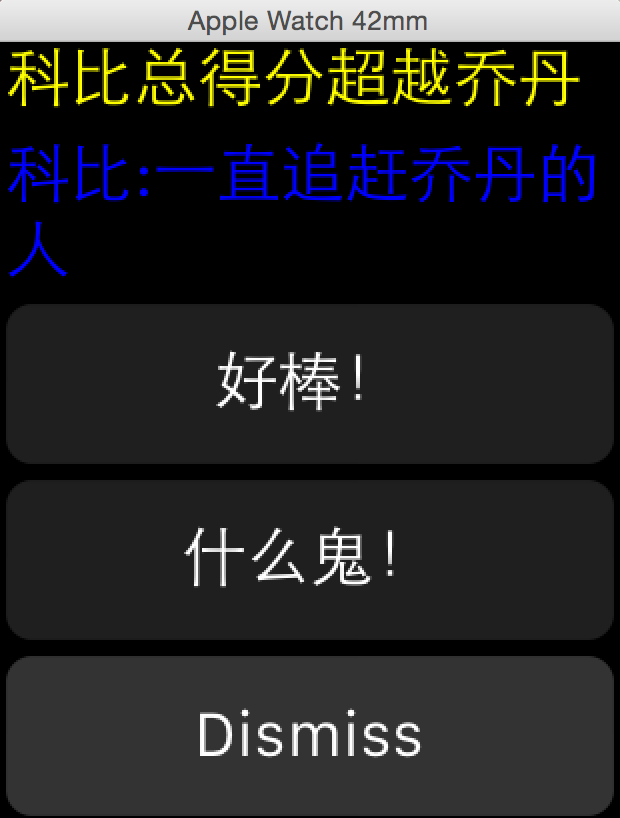
自己简单的修改了一下默认的那个payload文件,尝试了一下动态的通知界面,调试的时候记得修改一下scheme,记得要去选择那个Payload文件。如图:

notificationcontroller中的代码如下:
- (void)didReceiveRemoteNotification:(NSDictionary *)remoteNotification withCompletion:(void (^)(WKUserNotificationInterfaceType))completionHandler {
    NSDictionary *newsDic = [remoteNotification objectForKey:@"aps"];
    NSString *title = [newsDic objectForKey:@"title"];
    NSString *digest = [newsDic objectForKey:@"digest"];
    [self.newsTitle setText:title];
    [self.newsDigets setText:digest];
    [self.newsTitle setTextColor:[UIColor yellowColor]];
    [self.newsDigets setTextColor:[UIColor blueColor]];
    completionHandler(WKUserNotificationInterfaceTypeCustom);
}notificationpayload.json中的代码如下:
"aps": {
"alert": "新闻",
"title": "科比总得分超越乔丹",
"digest": "科比:一直追赶乔丹的人",
"category": "myCategory"
},

"WatchKit Simulator Actions": [
{
"title": "好棒!",
"identifier": "firstButtonAction"
},
{
"title": "什么鬼!",
"identifier": "secondButtonAction"
}
],
}
代码实现效果如下:
总结
这篇主要是收了个尾巴,基本的文档看得差不多了,或多或少的对Apple Watch的开发有了一些了解,加上两个demo的研究,应该可以动手实战了,Xcode Beta 6.2 出来之后变化还是挺多的,所以还是时刻关注官方的release note吧。而且目前来说不是很稳定,有一些bug,查看论坛,苹果工程师的回复也是:提个bug报告去。。。
Stay Hungry