本文通过使用iOS8中新加入的类,实现了通知中心中透明按钮,使得栏目按钮的风格样式和通知中心的相似。
需求背景
iOS8 中新加入了TodayWidget的功能,开发者可以在通知中心的Today中加入自己程序的扩展程序,丰富自己的软件,将最重要的部分及时的呈现在用户的眼前,由于通知中心的特殊性,比如背景,是统一的,那种暗暗的背景,类似于毛玻璃的那种感觉,因此在视图的UI设计上应该尽可能的贴近通知中心的风格,目前看到的许多Widget 中,只有Clear这个软件(额..至少我用到的是这个样子)使用了透明的文字来更新它要展示的一句名言警句。看上去非常的好看,因此想到了在自己的软件中实现这种透明按钮的想法。
前期调研
iOS8中新加入了 UIBlurEffect 这个新的类,用来实现一些模糊透明的效果,之前想要实现的话挺费劲的,这次苹果自己提供了这个类,也是造福了一下开发者吧。
typedef NS_ENUM(NSInteger, UIBlurEffectStyle) {
    UIBlurEffectStyleExtraLight,
    UIBlurEffectStyleLight,
    UIBlurEffectStyleDark
} NS_ENUM_AVAILABLE_IOS(8_0);
UIBlurEffect 提供了三个基本的效果,一开始使用的时候我没有打算使用这三个中的任何一个,因为尝试的时候发现这三个效果在today中显示的非常突兀,有点像强行加上的一个画板上弄出来一些View 不是很好看,经过查看文档又发现这个 NCWidgetProviding 协议中有一个 @interface UIVibrancyEffect (NotificationCenter) 这个接口单独给NotificationCenter使用,类方法:+ (UIVibrancyEffect *)notificationCenterVibrancyEffect;
可以生成一个通知中心风格的透明效果,于是我第一次的时候是尝试的这个,效果确实符合了通知中心的样子,但是文字的效果很差,在用户界面是很暗的时候,文字几乎就很难看见,具体的实现效果如下。如果使用这个实现出来的按钮很影响交互,因此这个方案也就没有采用。PS:这里要注意添加子视图的顺序。
UIVisualEffectView *effectView = [[UIVisualEffectView alloc] initWithEffect:[UIVibrancyEffect notificationCenterVibrancyEffect]];
effectView.frame = self.view.frame;
for (UIButton *topciButton in _buttonArrays) {
    [effectView.contentView addSubview:topciButton];
}

[effectView.contentView addSubview:_tableView];
[self.view addSubview:effectView];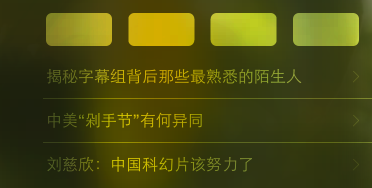
当用户使用的是比较暗的背景的时候,就会出现文字看不清的情况。。。
具体代码设计
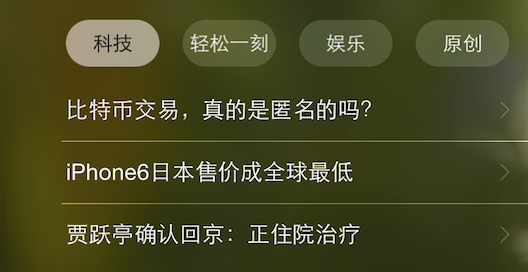
最后的最后我决定自己去封装一个按钮,写了一个UIView 的子类,我预想的UI布局是四个椭圆形的按钮并排排列的样子,既然前边 UIBlurEffect 提供的三种方案会有一个明显的背部面板,于是我决定采用第一种UIBlurEffectStyleExtraLight 这个效果来作为我的子类的上的第一个View。索性就把背部的这个面板当做按钮的可变的“状态”。
这里需要注意的是苹果官方给的建议是,如果采用了这种实现模糊背景的方法,那么需要把所有的子视图都放在UIVisualEffectView 上,这样子才会有透明毛玻璃的效果。
接着上边说,我的需求是尽量让文字清晰,按钮背景是毛玻璃,于是我的思路是,button上就加一个UIVisualEffectView 然后button上再加一个label用来盛放按钮的title。按钮的点击状态和没有点击的状态,通过设置UIVisualEffectView 的Alpha值来定义,模拟出来一个按钮的状态。下边是头文件的定义,在生成按钮的时候定义按钮的状态,通过state属性来响应的变化按钮的状态,通过代理来实现按钮的实际的操作任务。
  typedef enum {
    TodayWidgetVibrantButtonSelected,
    TodayWidgetVibrantButtonUnselected
} TodayWidgetVibrantButtonState;

@class NTESNBTWVibrantButton;
@protocol NTESNBTWVibrantButtonDelegate <NSObject>

-(void)didNTESNBTWVibrantButton:(NTESNBTWVibrantButton *)vibrantButton atIndex:(NSInteger)index;

@end

@interface NTESNBTWVibrantButton : UIView

@property (nonatomic, assign) TodayWidgetVibrantButtonState state;

@property (nonatomic , copy) NSString *text;

@property (nonatomic, weak) id <NTESNBTWVibrantButtonDelegate> delegate;

@property (nonatomic , strong) UIFont *font;

-(instancetype)initWithFrame:(CGRect)frame withTitle:(NSString *)title state:(TodayWidgetVibrantButtonState)state;

@end下边是具体的实现代码,难度不大,大家应该可以看得很明白,就是通过设置按钮的不同的状态来切换_visualEffectView的透明度 以及label 文字的颜色,用来区分按钮不同的状态,为了切换时候的美观,按钮状态改变加了一个小小的动画,显得切换的时候不是那么突兀。
@implementation NTESNBTWVibrantButton
{
    UIVisualEffectView            *_visualEffectView;
    UILabel                       *_titleLabel;
}

-(instancetype)initWithFrame:(CGRect)frame withTitle:(NSString *)title state:(TodayWidgetVibrantButtonState)state
{
    if (self = [super initWithFrame:frame]) {
        self.text = title;
        self.state = state;
        self.backgroundColor = [UIColor clearColor];
        self.exclusiveTouch = YES;
        [self addGesture];
        [self initSubViews];
    }
    return self;
}

-(void)setText:(NSString *)text
{
    _text = text;
    _titleLabel.text = text;
}

-(void)setState:(TodayWidgetVibrantButtonState)state
{
    _state = state;
    if (state == TodayWidgetVibrantButtonSelected) {
        void(^buttonTap)(void) = ^(void)
        {
            _titleLabel.textColor = [UIColor blackColor];
            _visualEffectView.alpha = 0.7;
        };
        [UIView animateWithDuration:0.3 animations:buttonTap];

    }else
    {
        void(^buttonTap)(void) = ^(void)
        {
            _titleLabel.textColor = [UIColor whiteColor];
            _visualEffectView.alpha = 0.2;
        };
        [UIView animateWithDuration:0.3 animations:buttonTap];
    }
}

-(void)initSubViews
{
    _visualEffectView = [[UIVisualEffectView alloc] initWithEffect:[UIBlurEffect effectWithStyle:UIBlurEffectStyleExtraLight]];
    [self addSubview:_visualEffectView];
    _titleLabel = [[UILabel alloc] init];
    [self addSubview:_titleLabel];
}

-(void)layoutSubviews
{
    self.layer.cornerRadius = self.bounds.size.height/2;
    self.layer.masksToBounds = YES;
    _visualEffectView.frame = CGRectMake(0, 0, self.bounds.size.width, self.bounds.size.height);
    _titleLabel.frame = CGRectMake(0, self.bounds.size.height*0.08, self.bounds.size.width, self.bounds.size.height*0.8);
    _titleLabel.text = self.text;
    _titleLabel.font = self.font;
    _titleLabel.textAlignment = NSTextAlignmentCenter;

    if (_state == TodayWidgetVibrantButtonSelected) {
        _titleLabel.textColor = [UIColor blackColor];
        _visualEffectView.alpha = 0.7;
    }else
    {
        _titleLabel.textColor = [UIColor whiteColor];
        _visualEffectView.alpha = 0.2;
    }
}

//添加手势动作
-(void)addGesture
{
    UITapGestureRecognizer *tap = [[UITapGestureRecognizer alloc] initWithTarget:self action:@selector(didNTESNBTWTopicButton:)];
    [self addGestureRecognizer:tap];
}

//delegate方法
-(void)didNTESNBTWTopicButton: (UITapGestureRecognizer *)tap
{
    [self.delegate didNTESNBTWVibrantButton:self atIndex:self.tag];
}
最终的显示效果,满足了自己的使用需求。